Today’s guest post for my friends at BikerMetric.com is “3 Affordable Tools You Didn’t Even Know You Needed.”
Getting new tools is amazing, but sometimes they can be expensive. Weeks and even months can go by without adding a new tool to your garage arsenal; but what if there were 3 affordable tools you didn’t even know you needed? A great proposition, right? You could run out to the store right now and grab them or jump on the internet and place a quick order.
Either way, there are more than a few tools out there that are both affordable and highly useful. I have chosen three to highlight below. One of these might be the quick fix (no pun intended) for that money burning a hole in your pocket right now.
3 Affordable Tools You Didn’t Even Know You Needed
Here goes, in no particular order.
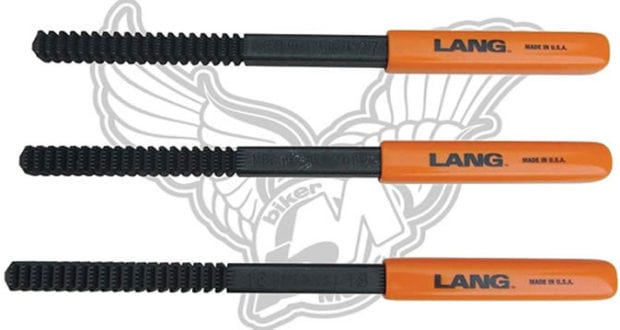
 1. Thread Files
Introduction: There is a highly useful tool out there to help repair the damaged threads on a bolt or stem that you might not currently have in your tool chest. I am sure you have taken a wire brush to some old threads in order to clean them up and called it good enough.
Additionally, depending on your skill level, you may have a tap and die set and have cut new threads on an existing shaft. Somewhere in the middle of using a wire brush and using a die is the process of using a thread file.
Use: The purpose of thread files is to clean up damaged threads without actually cutting new ones. When used carefully, they can clean out and actually straighten/realign existing threads such that they are good enough to go back into service. Sometimes you can actually see that one bent or damaged thread and using a thread file can put it back in place.
How To: The key to using a thread file is to carefully determine the correct spacing. All threads have a pitch and spacing. They can be coarse or fine and they can be tightly packed our very wide. When using a thread file, you want to carefully set the files into the bolt grooves until you find the perfect match. There is actually another tool for this (called a thread gauge), but you can do it with the thread files themselves. The bumps on the file should fit perfectly between the existing threads. This isn’t an almost or something close deal. The thread file and threads should fit together with no space or skipping.
Then the key is steady strokes. Set the file in the threads and pull toward yourself, essentially cleaning up the grooves or valleys in the threads. Set the file back in the threads and repeat. I like this one direction of motion technique (i.e. pulling toward yourself). I find it is less likely you will skip threads doing it this way versus using a back and forth motion (think starting a lawn mower versus sawing a piece of wood).
Typically, thread files come in sets. Each rod “end” provides 4 potential thread spacings. The rubber handles come off (can be switched to the other side) and underneath you will find four more possible thread spacings – 8 total for each rod.
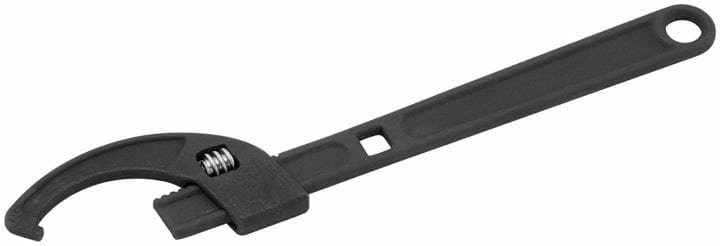
2. Steering Stem Nut Wrench
Introduction: Seriously if there was a contest out there for the most frequently mangled part on a motorcycle, I think the steering stem nut would take the cake. These guys or gals (whatever genre you prefer) take a ton of abuse from weekend mechanics who attack them with pipe wrenches, screw drivers, and hammers. Taking a look at the picture below, you can see why. Just looking at it, you think to yourself, “sure, I could just stick a screwdriver in one of those slots and bang away with a hammer.”
 Problem is that on older bikes those steering stem nuts have been there a while. The threads have probably also rusted a little. Therefore, when you go at it with a screwdriver and hammer you are about 100 times more likely to snap off a tab then actually make the nut turn. I have seen these guys with most of the tabs snapped off as someone was being real stubborn and not giving up on the screwdriver or pipe wrench method.
Use: Now, what if I was to tell you that there is a special wrench designed for this very job, and it’s less than $30? Surprising right? Well, not really, but you don’t know what you don’t know.
How To: The key to using the steering stem nut wrench is to get that little tab firmly seated into one of the slots on the steering stem nut. Really make sure that it is in there making as much contact as possible on its three “faces.” The other really nice thing about this particular steering stem nut wrench is that square slot in the middle. That isn’t for aesthetics; it is for a 3/8ths inch drive. You see where I am going with this. Grab your breaker bar, put on a 3/8ths adaptor and you have now quadrupled the length of the steering stem nut wrench handle, providing all the added leverage and torque you need to finally break free that steering stem nut. Don’t forget some penetrating oil and a pair of safety gloves. You are bound to slip once, and you don’t want to whack your bare knuckles.
3. Crows Feet
Introduction: The last tool I want to bring up is an often-overlooked tool in the age of angled or hinged sockets and these are crows feet or the crowfoot. In the age of hinged sockets these indispensable tools are forgotten and can be a life safer.
Use: To get in a spot where nothing else fits. The best example I have is cylinder base nuts on many large displacement engines. The engine cooling fins will often get in the way, even for a hinged socket. Additionally, even if you can get a hinged socket over the top of a cylinder base nut, one edge will be rubbing against the cylinder. This can result in two problems. First, inaccurate torque readings as the rubbing throws off the torque wrench. Second, not enough room to remove the hinged socket once the nut has been tightened to specification. To the rescue comes the standard crowfoot.
How To: From the picture, you can see that usage is very self-explanatory. Generally, they are 3/8ths or 1/2-inch drive and are open on one side. This allows a cylinder base nut or other limited access large nut to be tightened carefully to the proper torque setting without any rubbing or binding. I have a set of these from Craftsman, which I prefer since they are of the highest quality. Frankly they are the only tool I choose for tightening cylinder base nuts on my Harley because I can slap them on a torque wrench and get the tightening just right.
Conclusion
So that’s it for me – 3 Affordable Tools You Didn’t Even Know You Needed. The thread files I probably recommend the highest. They are the cheapest, will come out of the tool box the most often, and will save you a ton of money in the long run. That said, I still think you should have all three!
Author Bio:
Chris is a DIY Motorcycle Repair nut (pun intended). He advocates getting to know your motorcycle and experiencing the rewarding thrill of success that can only come through picking up a wrench and working on your machine. He is an active blogger on his website HappyWrench.com. He began wrenching out of necessity at a young age and has continued to teach himself and others through his research and writing. He believes anything is possible with a little ambition and patience.
Get the best of bikerMetric directly in your inbox, once a week, every week.
[wysija_form id="1"]