by Dave of Helrich Cycles

Some folks doubt that a skateboard product can keep up with the wear and tear a used-daily motorbike would impose upon a measly skate wheel. Dave assures those who worry that yes, “bearings wear out and the wheels won’t last and they will only fail, fall apart and you will eventually die.” He also says that while bearings wear out on these just like motors and trannies, to extend the life of the wheels and bearings, buy high dollar bearings. “I usually spend around $10 to $15 per bearing, and yes, the wheels wear out, but the higher the hardness the longer they will last,” he says, “what usually happens is that the chain will wear a groove in the wheel, but then will stop wearing. This groove is actually a good thing because it helps keep your chain aligned where it wants to ride.”

Dave has built one bike that has been on the road for almost four years and is ridden every day. It has over 25,000 miles on it and the owner has changed the wheel twice. We don’t b**ch about changing our oil every 3,000 miles so this seems like a good deal.

from left to right: powell & peralta (dave’s favorite), old school to’s (really good but too wide), tunnel tarantula’s (this side of worthless – very soft and way too big), the new style wheel (completely worthless, way too narrow)
Dave has been busier than a one legged man in an *** kicking contest and I’d like to thank him for taking time to write this.
So grab a brew, take notes and discover a cool and clean way to keep your chain tight. Take it away, Dave:

old style chain tensioner worked great but just didn’t look that good, and
spring was under too much lateral pressure
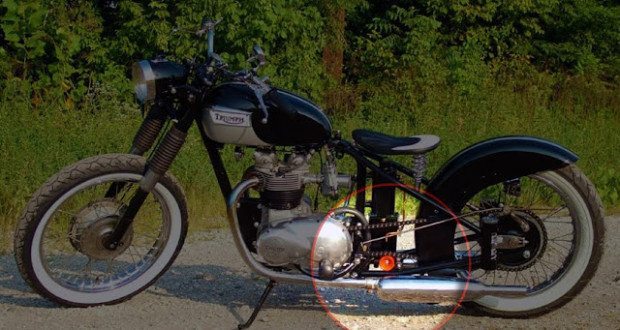
So you’re cruising around on eBay and you keep on seeing these little skater wheel thingys on the chains of really cool bikes and you want to be one of the cool kids so you gotta have one. Well, I’m here to tell you how to do it and do it right. First off it’s called a chain tensioner and the purpose of it, besides looking cool, is to keep tension on the chain. If you are running a stretched hardtail you will probably want one of these because your chain is really long and you are too lazy to keep it perfectly adjusted, so it’s bouncing around and slapping stuff like your oil tank.
So here are a few rules for your chain tensioner wheel thingy:
1. Where does it go?
They go on the bottom of the chain. “The bottom part of the chain” is the chain leaving the motor going to the wheel sprocket. The top of the chain is from the wheel sprocket and into the transmission and is the drive side of the chain. It may seem obvious but I’ve seen a number of guys who run them on the top chain. This is usually because they don’t understand how a chain works, or they can’t fabricate and are using it to stop the chain from hitting the oil tank.

newer style chain tensioner – looks much better and works even better and spring isn’t under as much lateral pressure
Douchebag Prevention Plan: If you put the tensioner on the drive side of the chain you should re-read the previous paragraph and re-apply your tensioner to the bottom chain to avoid the mocking laughter of dudes who know better.
Additionally, putting the tensioner on the drive side only adds undue stress on the chain and can cause it to mis-align with the motor sprocket. Then it will break and you will eventually die, maybe because you tore your leg off. So one last time; the tensioner goes on the bottom of the bottom chain, between the chain and the frame rail.

back side of the newer style – notice the bolt on the top arm
which is used as a spring retainer and height adjustment
for the arm so it doesn’t bottom out.
put a bolt through the bottom arm for more adjustability.
2. You want the tensioner near the middle of the chain, where there is most slack. If you have it too close to either sprocket it does not do much good. I prefer to put mine about one-half to one-third of the way towards the engine sprocket because it looks good there and it is usually out of the way of other things like fender mounts and what not. It also works well in this position since half way between the two sprockets is where the most amount of slack is, and the point of the chain tensioner is to take the slack out of the chain.
3. The tensioner should be adjustable. I like coil springs for this as they keep the chain under constant tension. There are some dudes that run a fixed gear on an adjustable angle. These simply act as a secondary chain adjuster and this is not really a tensioner. Fixed gears are used more for keeping the chain in line with the sprockets, not for keeping the chain under some sort of constant tension. Also, using this design, if your chain gets too loose a fixed gear can cause more damage than good.

dave’s favorite: powell & peralta with a 530 chain across it with a decent amount of room on either side
4. What kind of wheel should I use?
I prefer skateboard wheels. Some guys use gears and I’ve seen some made out of a really hard composite. The only reason I have heard for not using a gear is that if it seizes for any reason it might lock up your chain. I have a hard time seeing this happen but I guess it could. The skateboard wheels I like are the older style or longboard wheels, something with a wide and flat surface for the chain to ride on. The wider the wheel is, the more room the chain has to wander without slipping off.

new style wheel with a 530 chain across – it’s much too narrow and your chain will roll off to one side or the other and stay there – after this something really bad usually happens
The newer rounded wheels are no good because there isn’t enough room for the chain to ride on and it will slip. Then bad things happen like your chain comes off. You also want ones with a hardness around 85 or higher. I use high-dollar sealed wheel bearings from a skate shop, or a bearing supplier.
One of the most common questions I get is “how long does the wheel last?” To be honest, I am not sure. I suspect 10,000 miles. If you buy a pack of four, it doesn’t take much to change the wheel and put a new one on. Like everything else, you get what you pay for; if you buy $2 bearings expect them to last, well, about $2 worth. Pony up and buy decent sealed bearings. Do the same for your wheels.

belt tensioner off a modern car – works great but looks really big unless you have a big bike
5. So how do you make one?
The basic idea is based on a triangle. Basically, you have a static plane made of the bottom pivoting arm, a resistance arm, and the spring.
Another way to think about it is like a catapult. You have a solid base and an arm that chucks big rocks that are attached to the base. The only difference is the catapult uses the internal springiness of the arm to chuck rocks. We use a spring to chuck the wheel into the chain.
I have made these a few different ways and I don’t have any sort of precise measurements or anything like that because each one is made specifically for each bike and there are a number of variables. Still, there are a few things that I have figured out after making a few of these.

I like the pivot point of the triangle pointing toward the rear sprocket. I don’t really know why I ended up doing it this way but they just seem to work better. I did have someone with a PhD in engineering tell me that it doesn’t really matter which way it faces but it seems to make more sense the way I do it and that’s good enough for me.
I have found out that a shouldered 5/16 bolt (the long bolts with a section that isn’t threaded) works perfectly for the bearing to ride on. You want one with around 1¼ to 1½-inch of shoulder on it, then you can cut the excess threads off.
I use springs from my local hardware store because they have a decent selection. You want a spring that is fairly firm and hard to squeeze with your fingers. If you are using a regular coil spring you need something to keep the spring from popping out from under the load. I like to use 5/16″ bolts to do this; one for the top and one for the bottom. If you have them thread into the static and pivot arms you can also adjust their length to use them as a stop. This can be handy if your chain is close to the frame and you are worried about it hitting the frame rail.

If all of this sounds too complicated or too much work, here is the “cheap and easy” fix; buy a belt tensioner for a car. They have an internal spring and the tension is adjustable. On top of all that, they last forever. All you need is a plate with a hole in it to bolt the tensioner to.
So now you have everything you need to know to make a good chain tensioner that not only looks good, but works great to boot.
+ + +
There you have it, the cool skateboard guy way to keep your chain tight. Be sure to check out Dave at Helrich Cycles to see what other cool things he does when he builds a custom bobber.
>>
Get the best of bikerMetric directly in your inbox, once a week, every week.
[wysija_form id="1"]

looks my old rollerskate wheels. almost
Hate to say it but clearly you’re not the master fabricator engineer you think you are if your greatest reason for not putting the tensioner on the top is “people won’t like you”. Think about this logically, if in your mind it will rip your legs off by tensioning it from the top, then how is it okay to tension it at the bottom so the chain is tensioned at the top? It’s literally the no different.
Chris, think about it mate, while the chain is under load the top of the chain is under tension and all the slack is at the bottom, just flailing around like an angry Taipan (snake).My f650 gs is a mongrel to keep adjusted properly so I’ll definitely be making one of these pensioners. I can’t find a second hand wheel anywhere (**** scooters) so I’ll have to buy one. Once done my chain clunking days will be done.