Here is a piece about lacing and balancing the rear wheel of the FREEDOM or DEATH Machine which was written by somebody who is now nameless. The article is still good.
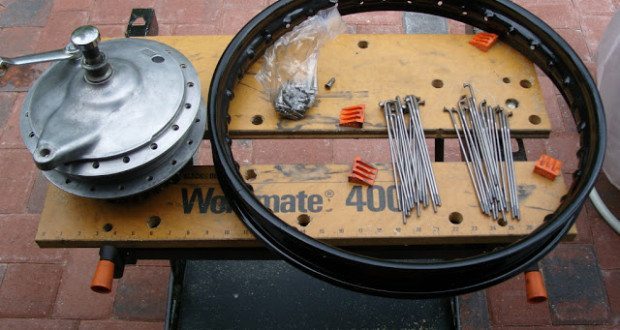
The wheels that are being laced are a bit funky. The front is a Honda CB350 drum laced to a 21″ rim and the rear is an XS hub laced to a 21″ rim. Both are using custom-made zinc coated spokes from Buchanan’s. The following is the construction of the rear wheel.
[NOTE 06.22.12: too bad it isn’t the front rim as this is probably the guy who put the front tire on backwards, placing the drum on the wrong side of the wheel with the torsion bar in the rear of the brake which would have snapped and which no less than five “builders” failed to recognize]Here’s the cleaned XS hub, zinc coated spokes (both inners and outers), the nipples, and the painted rim:

First, check all the clearances to make sure everything is going to fit nicely. Buchanan’s told us that the rim might need to be drilled out for the nipples because the spoke diameters were a little larger than the stock ones. The difference between the rim holes and the nipples was very small so it got drilled out just a tad.

A slightly larger drill bit will allow for enough play and won’t bind the nipple in the rim.

When drilling the rim, make sure to follow the angle of the original hole. Elongating a hole is a bad thing. Keep the holes circular, not oval.

Once the rim is prepped, snag your set of spokes. The spokes with the harder angle are used on the outside of the hub. Begin by putting these in every other hole around one side of the hub.


Grab your other spokes and notice that they have less of an angle on the hub end. This spoke is used for the inside of the rim. Fill the remaining holes on the one side of the hub.

Once one side is all laced up, you should be able to lay the spokes in a manner that resembles the end result.

Flip the hub over and begin the other side. If your hub is new, you won’t have any indentations from the old spokes to show you which holes correspond to the outer spokes. To determine which hole to begin with, hold an outer spoke on the opposite side and place a spoke through the hole on the new side, two holes down, opposite your reference spoke.
The patterns are the same on both sides, but just out of phase with each other. This can be seen by looking at the rim as well.

Here’s a shot of the mark left from an old spoke. It will also show you the proper angle that your spoke should lay when you lace the wheel. If the spoke is pretty far off from this mark, the assembly may end up with too little or too much spoke in the nipple and an incorrect and dangerous spoke pattern:

Once you have determined your starting hole for the spokes, drop in the remaining spokes in the same manner as the first side.
Some spokes may be hard to squeeze through the holes in the hub and may need some persuasion. Typically they should just pull straight through, but if they’re stubborn, some may need a little force. If a lot of force is needed, the spokes may be incorrect for the hub.

Once all the spokes are installed in the hub, maneuver them such that they are near their proper installation position and place the rim over the assembly. This can take a little while because it’s a mess a this point.

With the rim placed around the hub and spokes, grab an outer spoke on the top side of the hub and see which hole it lines up with best. Check the angle of the mark on the hub from the old spokes (if you can) to make sure that it is proper. The hole in the rim should also be at a very similar angle to the spoke. If the hole lines up properly, place a nipple through the rim and thread it onto the spoke. Only put a few turns on it so that you can manipulate the hub to line up the rest of the spokes.

For this assembly, there should be three holes between a repeating spoke. Grab an outer spoke next to the one you just installed and place it at a similar angle relative to the hub. Find the hole that it lines up with and this should be three down from the installed spoke. Place a nipple on it and continue this until all of your outer spokes are installed on one side. Do this until all of the outer spokes have been installed and it’s time for some inner spokulage.

The inner spoke on the same side should go in the middle hole between the installed spokes. Again, the hole should line up very well with the spoke. Follow this pattern around until all of the spokes have been installed on one side.

When finished, flip the assembly over and begin the other side. This time the inner spokes must be installed first. If the outer spokes are installed first, you may not be able to line up the inner spokes if they aren’t already laying near the proper position.

Take an inner spoke and line it up with a corresponding hole. The hole for this spoke should be between the installed spokes from the opposing side. Lace all of the inner spokes and then finish up the outer spokes.
Once all of the spokes are installed, step back and look at the assembly. Does it look right? If it doesn’t, it probably isn’t. Go back and recheck all of your angles, make sure the spoke patterns are the same, make sure your spokes don’t seem too short or too long. If the pattern does look correct, it’s time to tighten and true and find a stranger to high-five; or a stranger to brag to in a bar; or show it off to the woman you date or married or whatever.

To tighten the spokes, I typically move around the rim tightening the nipples until it just barely covers all the threads on the spokes. It is critical to make sure all the spokes are tightened the same amount. Do not simply tighten one all the way and then move to the next. This will cause all sorts of problems including a wheel that looks more like an egg than a circle.

Once all of the spokes have their threads covered, there should be a bit more play left in them. To continue tightening, find the valve hole and use this as a reference for starting and stopping to make sure that you are snugging each spoke down the same. Move around the rim, starting at the valve hole and snug the nipples down by hand, keeping an eye on how much of the thread is in the nipple or sticking out of the back side of the nipple. This can be seen by viewing the nipples from the outside of the rim where the spokes may eventually protrude.
As can be seen in the picture below, the spokes are sticking out of the nipples a bit, but they are all even and they don’t protrude much. If the spokes are threaded down and they end up with a lot (1/2″ or more) sticking out, then something is wrong. Recheck your angles and reinstall the spokes.

At this point, the nipples should all be hand tight against the rim and the assembly shouldn’t have much wiggle in it. Place the assembly on a truing stand or old swingarm and begin to snug it down.

I like to first check to see if the rim is round. Place a marker near the seam of the rim and spin the assembly. If there is a noticeable bump, then the rim needs to be rounded. This is achieved by tightening the areas where the bump is noticed. Typically, if the bump is caused by the spokes pulling unevenly, there should be a corresponding bump 180 degrees around the rim. You will also notice that the weld in the rim will cause a noticeable bump. This cannot be removed, but with some patience, it can be minimized.

Once the rim is rounded, begin tightening the spokes evenly all the way around the rim. Start next to the valve hole as a reference.

Once the spokes are pretty snug, it’s time to true the rim. Place a marker close to the side of the rim and slowly spin the assembly. If a wiggle in the rim is noticed, find the spot that ends up closest to the marker and tighten the opposite side spokes. If a low spot is found, tighten the spokes on the marker side.

Once the rim has been trued, there should be very little change in the distance from the marker all the way around the wheel. The next step is to check “dish.” Dish is the position of the rim relative to the center of the hub. Some wheels need to be “out of dish” to make clearance for a disc brake or chain. To change the dish on a wheel, evenly tighten all the spokes on one side. This will effectively pull the rim over and offset it from the center of the hub.
I typically continue to tighten spokes and rarely loosen them during a wheel assembly. If I’m truing or modifying an existing wheel, I will loosen and tighten spokes evenly. After all modifications are finished and for a regular check of your wheel’s condition, take a wrench and tap all the spokes independently. Each spoke should sound nearly the same. If you hear a thud, that spoke may be loose.
When a wheel assembly is finished, grind down the extra spoke sticking out of the nipple and apply some locktite to the threads. Spinning perfection.
Now for a sight gag:

Get the best of bikerMetric directly in your inbox, once a week, every week.
[wysija_form id="1"]

One comment
Pingback: Rebirth of a Honda CB350 » Outdoor State of Mind