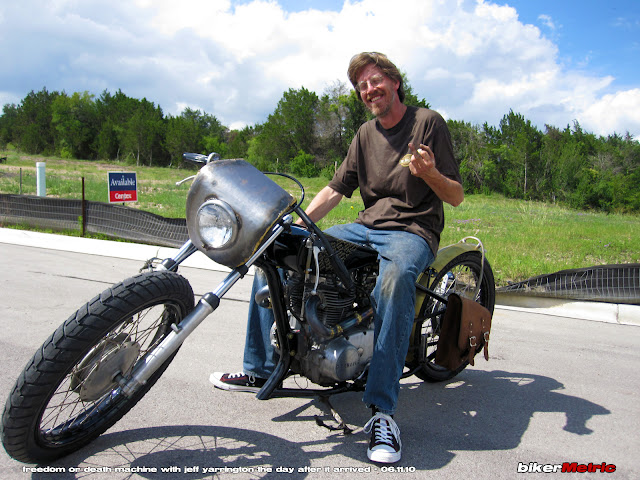
my xs650 chopper tale:
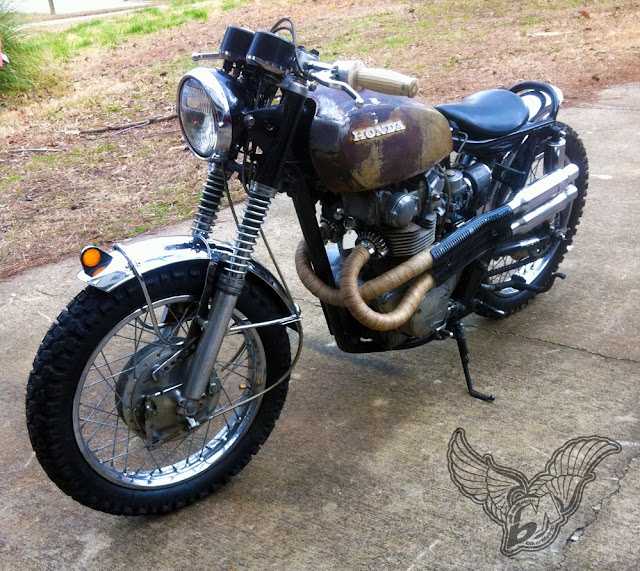
it’s a sad day but i have to do this. my xs650 chopper, the FREEDOM OR DEATH MACHINE, was delivered as a half-a**ed, ignored-then-rushed piece of f***ing s*** by jeff yarrington of “saint motorbikes.” after a year and a half, i’ve found the right man to help make her right. the page that was here is gone and what you will find now will be the FREEDOM OR DEATH MACHINE REBUILD.
before i go off, i must give the proper respect to those who donated parts and labor that was worth a s*** to help get the machine this far:
+ TC Bros: Second weld-on hardtail, two air ride seat suspension systems
+ Zombie Performance: bada** one-off-custom handlebars.
+ Elswick Cycles: Original weld-on hardtail (f***ed up by Saint Motorbikes and chopped for scrap), faux oil tank/real secondary gas tank.
+ Rock’s Chops: Footpegs, plate bracket/brake light.
+ 7 Metal West: Killer brass ribbed fender.
+ After Hours Choppers: 1″ Brass risers.
+ Biltwell: Exhaust kit and tons of killer swag (from ChopCult, too) to give away for FREEDOM or DEATH Motorbike Bash.
+ Lick’s: Distressed leather solo bag.
+ Fabricator Kevin: Seat hinge.
+ Bikernet: Beer money for FREEDOM OR DEATH MACHINE supporters and party goers.
+ Lowbrow Customs: Free party swag.
+ Independence Brewing: Beer sponsor for the Bash.
 |
| the FREEDOM OR DEACH MACHINE on october 14, 2010 |
AKA: DON’T F*** WITH ME AND I WON’T F*** WITH YOU
welcome to the freedom or death machine rebuild; a series of how to repair all the f***ed up s*** on the “motorcycle” jeff yarrington from saint motorbikes “built” for me with a 1979 yamaha xs650, over three grand in cash (the bike was $850) and $3,000 in donated parts. he had four months to build it. he sat on it for most of that time and tossed it together in two weekends.
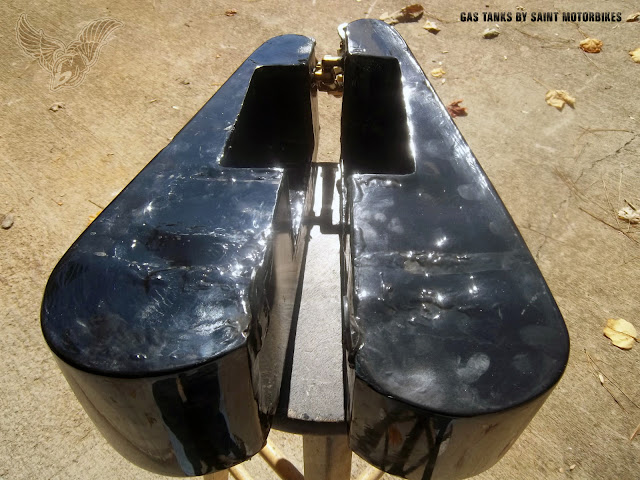
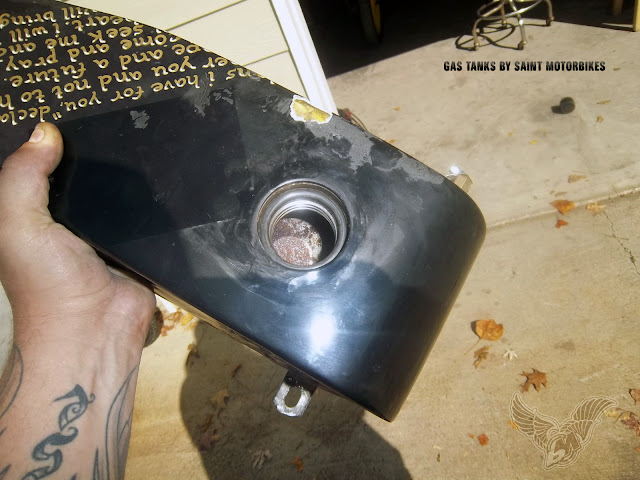
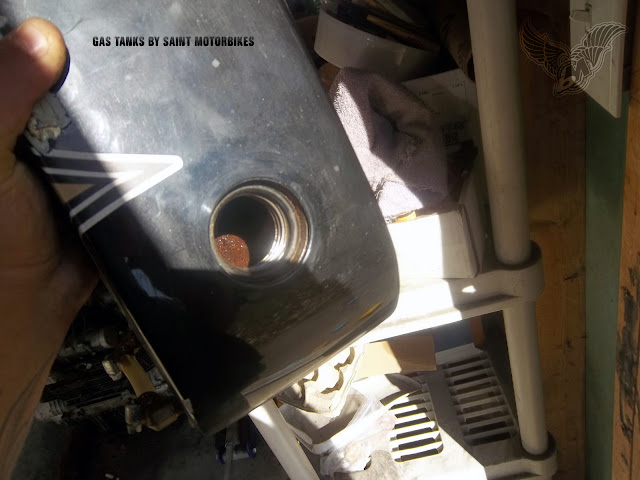
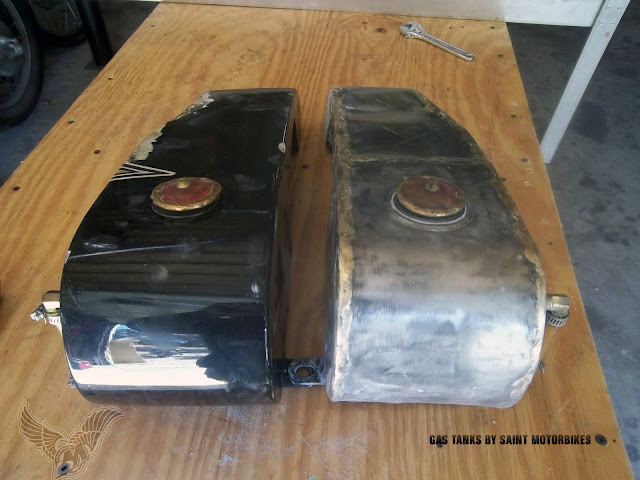
first up are the gas tanks. after owning the bike three weeks, the paint started to bubble. shortly afterward, the insides of the tanks began to rust. within a year, the tanks themselves leaked gas. right out of the bottom from numerous spots. it seems wherever jeff welded, the tanks leak.
it has been ridden five times. the brakes gave out on the second ride. the mechanic, limey, charged $420 (less than half his normal fee because i obviously suckered him) to make the bike “safe to ride.” so add another grand to the cost (i got a discount for suckering limey), before jeff’s “labor” and there is at least $7,000 into it.
but wait, there’s more! before limey got it, the bike was with matt from working man’s customs. matt was ****** because we took the machine to his garage and he gave up a month later after spitting “i’d charge eighteen hundred bucks to do what i did for your bike. i’m done with it!” he went on to say it was too much and good luck. can’t say i blame him, although he should have seen the handlebars were almost 2″ off center before he went and spent an afternoon cutting and re-welding the internal controls which were so impossibly attached that only a man with hands the size of a professional nba center could use them. seriously. when matt handed them to me, all “repaired,” they felt funny. i laid them on the concrete driveway to discover the bars couldn’t be placed down in any way without wobbling drunkenly.
i laughed (it was that or punch matt in his know-it-all face). then i got mad. i told matt he should have listened to me when i said we’d deal with the bars last, not first. he was ****** back at me because he knew i was right and that’s what he gets for thinking he was a know-it-all.
the lesson i have learned is “a picture is pretty and people say a lot of s*** they can’t really do.”
what i was told i’d get for my time and money and what arrived were in no way related. i thought i had a date with scarlett johansson but woke to discover a passed out crack whore asleep in my bed, with my wallet and stereo gone, and an overpowering scent of urine in the air.
with matt’s assertion that he put $1,800 worth of labor into a bike that today still has crooked footpegs, a crooked passenger pad, uneven fender mounts, 7/8″ bars in 1″ brass risers (thanks for that one, too, matt), and more, over nine thousand dollars has been invested in a machine i won’t ride because i don’t think the frame is straight.
+ $3,700 cash
+ $3,000 parts
+ $1,800 half-assed metal re-fab
+ $1,000 mechanic
we’ll see about the frame as the ForD is taken apart and for the first time set on a jig.
that’s right. it was built without a frame jig.
with help from eric at karnage kustoms, we are doing a complete rebuild and started today. he took the right tank off and that was what the inside looked like. he will be sending pix and updates for everything he repairs on the FREEDOM or DEATH MACHINE.
mind you, jeff owned an auto body shop for 15 years. besides re-fabbing these tanks from a set he got from some ****** on jockey journal, he covered them in a ten pounds of bondo. then he “painted” them.
they’re going to have to be re-built from scratch.
come back often to see all the before-and-after photos and information detailing how everything, and i mean EVERYTHING (the truth is shocking – expect a few dozen posts), was crooked, undone, half-a**ed, life-threatening, rusty, uneven, and generally nothing you want for anything but free since you’re going to have to re-build the rotten **** anyway.
it’s what you get when you give jeff and “saint motorbikes” seven grand and spend six months promoting him to tens of thousands of readers on your stupid biker blog. you get a shinya ripoff exhaust, “friends” who hate you because you’re ****** at them all, and a rusting, leaking, hazardous, crooked piece of f***ed up s*** sitting and sitting because you can’t muster the money to hire the philadelphia project to transport the entire thing half way up jeff’s a**hole.
look for a true garage builder to straighten this mess out. that will end up being me, the poser.
AKA: PEN VS. SWORD
video and death defying resurrection of the FREEDOM or DEATH MACHINE. the voice is eric of karnage kustomz.
okay. so they’re leaky. it’s only been 17 months. the bike has been stored in garages all that time. limey kept gas in her tanks for a few of those, but from march until july it was empty of all fluids and wasn’t refilled for rides until then.
it was then when eric and i had a serious conversation and i told him why the tank was bubbling and would soon be leaking. why the footpeg mounts were as off center as the original handlebars. why the front end wobbled. why i gave up so much because i believed in the builder. why now, i didn’t trust the frame to be straight…
we drank beer and stared at it. then we drank more beer and realized what an incredible undertaking it would be.
as outsider art from a retarded boy, these tanks are cool. as purpose-filled, gasoline leaking, measured-by-anti-psychotic-pill-width containers of combustible death rocket motor fuel, not so cool.
we searched for the o-rings. none were to be found.
AKA: THANKSGIVING
i am about to drink beer and watch football with some friends as the woman who inexplicably loves me makes the giant turkey day spread she is famous for.
because it’s thanksgiving the proper thing to do is to be thankful, even though the FREEDOM or DEATH MACHINE has been a nightmare since jeff from saint motorbikes brought her to texas over 17 months ago, she is finally getting the lovin’ she needs.
as you see with my perfectly horizontal lines across the bike, the footpegs are not even. from the top, it is apparent that the right side pegs don’t meet evenly with the left side. according to measurements eric has taken, they are over 1/2 inch off center.
when the bike arrived, the solid aluminum pegs by rock’s chops had yet to be installed, and matt at working man’s customs had promised the day the bike arrived he’d get them on. he did but didn’t tell me how uneven the mounts were that jeff had made. he also set them up so poorly that the first time i hopped on the bike, one of the mounts gave way and slipped down under my boot. turns out they all did that if they were stood upon. wow. thanks for your help, “working man.”
here is a view of the pegs from the rear:
i’m thinking a thousand words are not enough for that photo.
essentially, all four mounts are off center from left-to-right and top-to-bottom. i will have to shave at least three off and re-make them. then he will mount the pegs in a manner in which they won’t fall out from under me when i lean or stand or generally ride my motorcycle.
that is the ForD, disassembled by eric. according to him, there were no lockwashers on any of the motor mounts, nor were there any on the front mount of the seat, which is why they were loose (remember, it’s been ridden only a handful of times and has clocked no more than a two miles on the road).
as every dips*** knows, any type of bolt that can come loose from vibration and bolts to moving parts should have some sort of lock washer. working man also put the seat on, as he made it, and the front mount is a high quality piece from fabricator kevin. eric also wrote that “a lot of parts like the fenders and other spots on the bike are real rough on cuts and the holes will need to be smoothed out.” he promised more photos of the kind of workmanship those who “built” the bike i “designed” did on her.
finally, eric also told me that all the electrics were “hard wired with no type of connectors for servicing parts.” eric is a former hvac tech and after almost 15 years at it, he knows about wiring s*** properly. anybody who has seen him open the seat of his award winning xs500 cafe knows he is meticulous when it comes to the wiring and electronics. i am disappointed in limey as he told me in austin that he had “cleaned up” the wiring and that he was shocked at the condition the machine was in when i received her. he charged me $420 to fix things like that, less than half of what he said he would charge any other customer, and the condition they are in afterward is still as if the wiring was hooked up by a ******.
it’s what i get for trusting a man who didn’t drink beer.
why i am thankful is because within two weeks the machine is going to asheville to spend a day or two with eric and hugh, where they will determine if the frame is straight, and repair it if necessary.
AKA: STRIPPED NAKED: PART 1
we took the bike apart and eric made a little video to show how the steering dampener and kickstand were very poorly applied to the FREEDOM or DEATH MACHINE.
also, as mentioned in the comments below by an astute (and ironically anonymous) reader, the front brake torque arm is dangerous and should have been in tension position (before the brake), not compression (behind the brake).
here is a photo of the ForD‘s front drum brake taken on october 14, 2010:
i have never pretended to be a builder. i am a writer and designer and have learned more about the mechanics of custom metric motorcycles in the past year than i knew for the first 40 of my life. i trusted people who were paid to do the jobs i asked them to perform professionally and in a manner which would ensure a safe-to-ride chopper. this was something each of them (matt at working man’s customs, chis at limeybikes, and jeff at “saint motorbikes”) told me the bike would be.
chris charged $420 to fix a handful of half-a**ed s*** that was given to me by jeff yarrington at “saint motorbikes.” three of the supposedly minor things he was charged with were the kickstand, the steering dampener and the brakes.
chris told me the brakes were “repaired” when i took this photo of him when the bike was “done” in october of 2010 (taken the same day i took the photo above):
although he and others told me chris was a honda and yamaha “expert,” it seems this expert did not know knew the brake was on backwards.
initially, the drum was taken from a honda cb360 and modified to fit the stock xs650 forks. i will spare you pix of the gory multiple spacers on each side and the s***ty fit (for now), but here is what a proper drum brake looks like on the cb360 in the garage:
here is another view. notice the drum is on the left side of the wheel and in the proper “tension” position:
now that the frame has been liberated from all the cool stuff that was on it, we stripped the paint and found….. surprise!
bondo.
guess what was under the bondo?
stay tuned for more damning evidence!
AKA: SAVED BY TC BROS.
finally a post where i am not bashing dumba** f***tards. instead we have great news regarding the FREEDOM or DEATH MACHINE rebuild.
if you folks haven’t noticed, there is a nice banner on the top-right of every page for tc. bros. they are our latest partners, not only to advertise, but to assist with the rebuild of my sadly mangled metal love beast.
i’d been thinking, since the whole frame needs to be re-constructed from the ground up, that i might try to do something different and create a nifty suspension within the top rails of the hardtail, and adding an axle at the bottom. it wouldn’t give a lot, and it would be an interesting feat to accomplish, but it sure would look cool and anything is better than riding a hardtail, right?
not so fast, smartypants. when i posed that question to tim at tc bros., he told me i ought to try their air ride suspension and they would send a couple to me as i plan on riding the bike from tennessee to new orleans when she’s complete. he said the mountain bike springs i have are merely glorified old school seat springs, and as i’ve discovered, really don’t spring much, no matter how one adjusts the tension.
currently, the air ride seat suspensions have a goodyear logo on them, but the guys at tc bros. are making their own which will have their brand stamped in them next month. it is those air rides my shiny a** is going to bounce along the roads to my salvation upon.
i can’t wait!
the new hardtail will also be a tc brand. look for a review of both of these products as the build progresses.
i’m making a frame jig this week. wait until you see how crooked the steering neck is in the next installment of “f*** you, saint motorbikes!”
AKA: THE TC BROS. TAIL ARRIVES
tc bros. sent one of their famous xs650 hardtails this week. i ordered last wednesday. it arrived five days later. none of this “five working days” ****, either. it arrived monday afternoon. that’s freaking great. no ******** around.
but the box was pretty messed up.
“s***,” i thought as i asked the driver “what did you guys do to this?” he muttered something unintelligible and which i was unable to decipher.
“do you need my signature?”
of course not. he was running back to his truck to hit the fuel pedal and disappear.
mildly concerned with the condition of the package, but knowing it was a hardcore piece of steel inside, i brought it in…
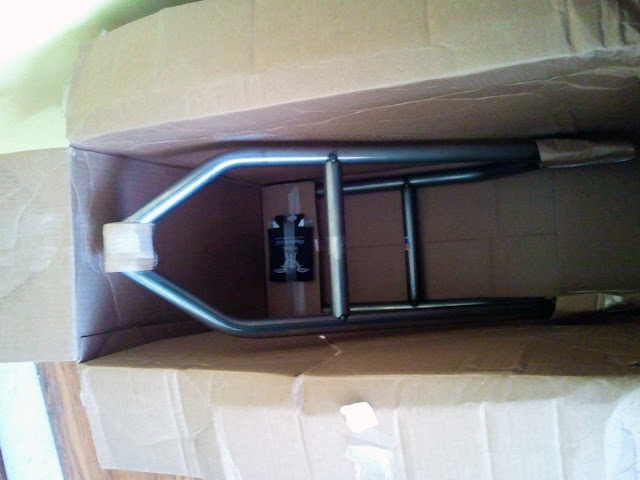
and tore it apart. this was my tc bros. yamaha xs650 hardtail:
wait. is that a beer koozie?
f*** yeah, it’s a beer koozie. most excellent. a sticker, too, which i’ve already applied to the laptop.
now for the serious stuff. some hardtail manufacturers will send their products and good luck to you. at tc bros, they hold your first-timer hand with four informative pages loaded with easy-to-understand instructions such as why a couple cross tubes are merely tack welded in place instead of fully attached, and why some xs650 model years will need a slight modification to properly accept the tail.
even a dummy like me understood everything.
even though ups obviously had a tap dance party on this box, the hardtail itself showed no signs of bending or breaking.
everything was in place and it looks like i have all i need to re-build my poorly hacked xs650 chopper frame.
with all the helpful information, and the beer koozie, any neophyte bike builder who can tig weld should be able to do this properly.
look for more info as we get this on the brand new frame of the FREEDOM or DEATH MACHINE.
as always when contacting one of our advertisers, please tell them you found them on bikerMetric. thank you and thanks tc!
AKA: MORE FROM TC BROS. AND CUSTOM ZOMBIE BARS
MORE FROM TC BROS. AND CUSTOM HANDLEBARS BY ZOMBIE PERFORMANCE
when last we heard about the FREEDOM or DEATH MACHINE rebuild, i had just received a nice new hardtail from tc bros. and was darned excited. today, we’ll get into the killer air ride setups they sent after we discuss the handlebars on the ForD.
when the bike was delivered to me, the integrated controls were placed so far from the grips that my girly little hands couldn’t reach them. the builder is about 6′ 5″ and i guess his basketball player-sized hands were the template he should use even as i told him i have average-sized hands and am 5’11”.
as you know, the bars turned out to be incredibly crooked, something that was not noticed by matt at “working man’s” until after he’d spent a few hours cutting and re-welding them into a position that would work for me. as i’ve recounted before, i took them in my hands and realized they felt iffy. laying them on the ground, it was obvious how f***ed up they were.
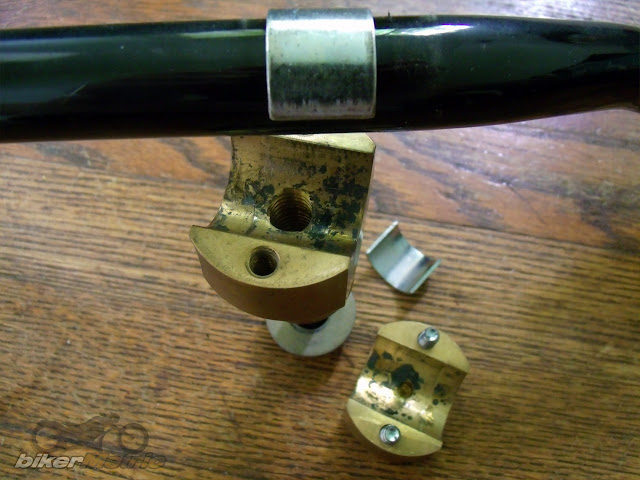
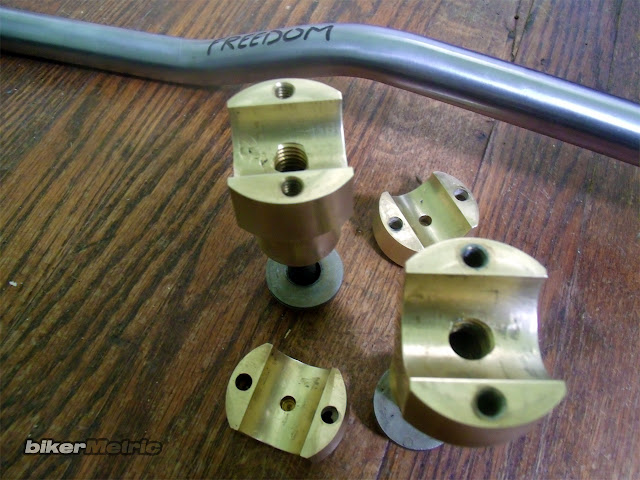
they were also 7/8″ bars in 1″ brass risers which were kindly provided by gabe at after hours choppers.
at that point, we told jeff yarrington of “saint motorbikes” that we needed new bars. 1″ bars would be best to properly fit the risers. i went to biltwell or someplace and told him “get these.” he f***ed up the first bars, matt was ****** off because he wasn’t smart enough to realize the bars were crooked as he handled them for hours, and jeff was going to make good by sending proper bars immediately.
he sent 7/8″ bars again. f***ing dumba**.
they were shipped to matt who put them on and did not tell me they were still the wrong size. this is what they looked like when i took them apart today:
you can see that the bars were painted black, as were the original crooked ones, which were assembled so hastily that the paint stuck to the risers. the original spacers were painted as i recall when seeing matt disassemble the bars from the risers back in june of 2010 because that is what he wanted, although i asked that we start with the footpegs so i could photograph them for rock, who made them.
not that he did those any better than anything else.
anyway, he didn’t bother to clean off the paint when he re-assembled these bars with half-assed spacers which were placed inside. thanks for that, matt. appreciate it, “bro.”
he was first dude to call me “bro” when this whole build began and i enlisted him to create a seat from a design of mine in return for some graphic design work in february, 2010. he never replied when i started sending him designs, anyway. guess he got what he gave. not that i gave much of a s*** by august, anyway. it is a major reason why i don’t trust “bikers” who call me “bro.” i am not your “bro.” i have yet to meet a “biker” who called me “bro” and was not a liar, thief, or fool. so f*** off.
now that i am done slamming the f***tards, let’s get on with how incredibly cool these handlebars from zombie performance are.
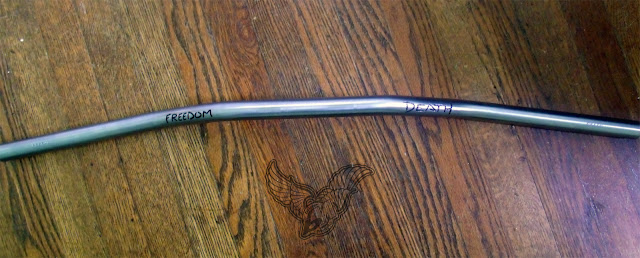
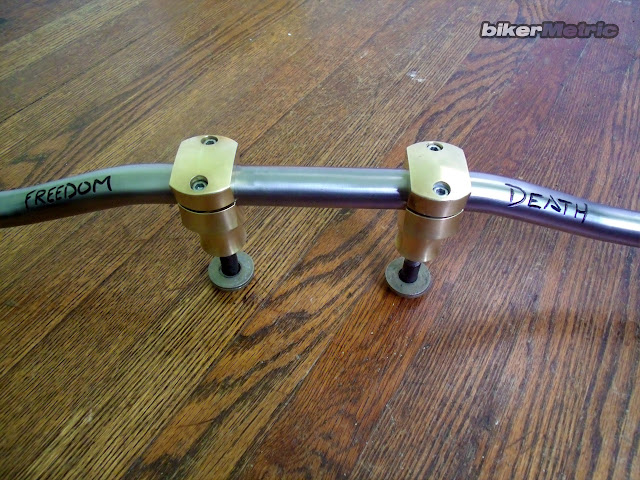
first, you can’t quite tell from this angle, but they’re not crooked! they set perfectly on the floor in any position i laid them in. amazing.
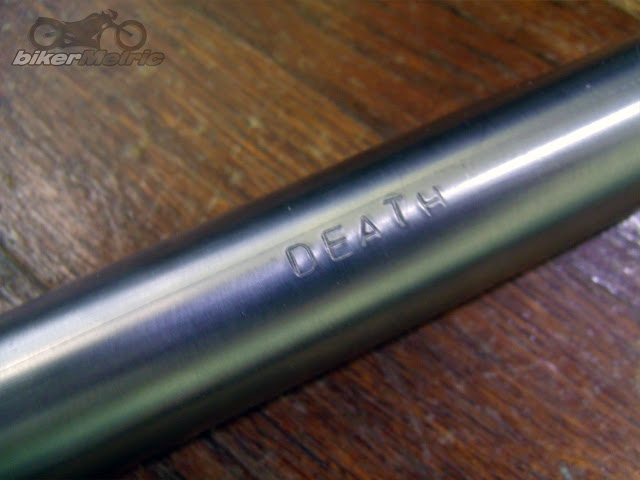
first, steffan stamped FREEDOM and DEATH on them in small letters where the grips will go. when he sent me photos, i thought it was cool and shouldn’t be covered by grips so he hand-engraved the words on the bars where they bend down and out. it’s kind of raw and i dig it. usually, neither freedom or death are very pretty. his idea fits the concept of the bike perfectly.
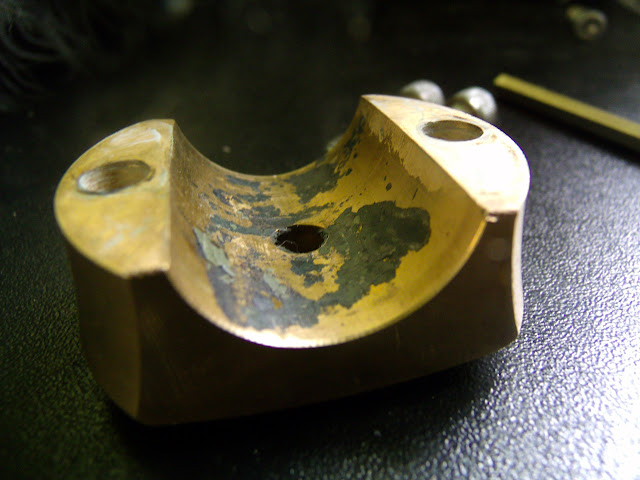
then i took a wire brush to the inside of the risers and got the crud off within five minutes. with a bit of brasso and an old rag they got a bit of their old shine back.
then i put the risers on and admired staffan’s work.
they look very cool and will eventually be painted black, but the FREEDOM and DEATH carving will get gold inside.
contact steffan at zombie performance and tell him i sent you. these are the best bars i’ve seen and from what he says, they were a pain to make. he really went all out to meet my exact specifications, and then added a unique touch i don’t think anybody would have thought of, much less actually done. thanks, steffan! these are going to look great on the machine.
then i took some more stuff from boxes….
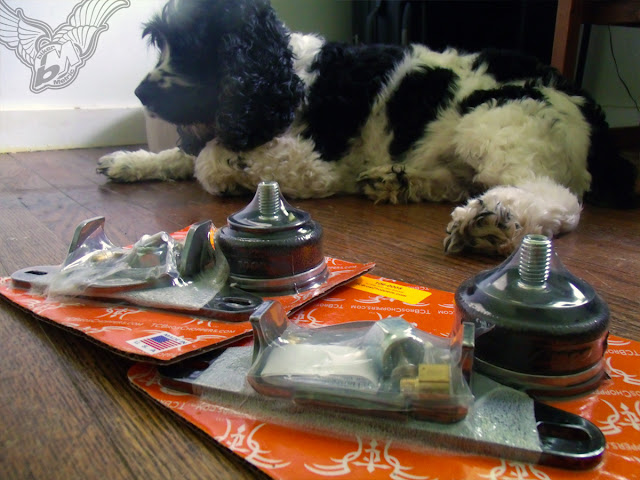
yes! two air ride solo seat packages. one for me, and one for the rack that will have to be torn apart and rebuilt because, guess what, it’s crooked!
regardless, you guys need these on your hartdail bobbers and choppers and i’m going to tell you why.
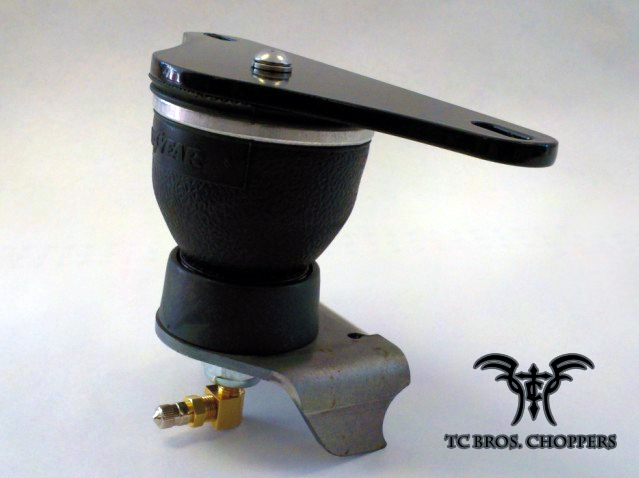
tim at tc told me these kits provides “the ultimate in comfort, vibration dampening, and adjustability” for my hardtail xs650 chopper. they arrived with a compact rubber air spring which offers superior vibration dampening compared to traditional seat springs or the crappy mountain bike shocks i originally installed. because they’re air-adjustable, the FREEDOM or DEATH MACHINE will now posses almost unlimited stiffness settings.
the air spring uses a bicycle-style schrader valve that allows the rider to easily inflate the air spring from 1 psi to 100 psi. tim says most riders prefer a 5 to 15 psi for maximum comfort.
there is over 2″ of travel, which is less than many seat springs, but with better vibration dampening due to the fact that there is no metal-on-metal contact at the rear of the seat to transfer vibration to the rider.
also in these packages were slotted mounting holes on a heavy duty 1/4″ thick steel seat bracket that is powdercoated black and ought to allow me to set them up using the threaded spring studs already on my pan.
the weld-on frame mounting bracket is formed from one piece of steel for solid strength and easy installation and is coped for perfect fitment on 1 1/8″ diameter frame tubing, which is standard for an xs650 and what my tc tail is already made of. regardless, these easily fit 1″ or 1 1/4″ cross members, too.
now to get one of these to throw in the solo bag:
 bikerMetric custom metric bobbers, choppers, and cafe racers by honda, yamaha, kawaski, and suzuki

