Here is our latest installment of techTips by Alex Chopperbuilder that he has called:
I realize that a great many folks will be very daunted by the idea of building their own frames from scratch, and in all honesty it is a very important part of the bike that can go wrong in tragically catastrophic ways, but it really isn’t as complicated and difficult as many people imagine. In keeping with our purpose of providing the information for you that you can arrive at a truly informed decision, keep reading, I’m pretty sure that by the end of this series of articles on frame building there will be quite a few of you that have a change of heart on the idea.
First though, let’s look at a couple of things to get us in the mood and the right frame of mind (Frame of mind! Get it? You know sometimes I make myself laugh. No? Please yourself!). Moving on….
What is a frame ? Well technically there a few different definitions around and they all tend to be filled with technobabble that seems to be designed to keep people from finding anything out about them and to make the people that write the definitions look clever. On my planet we have a word for this, it’s “bollocks.” A frame is nothing more than a carrying apparatus to hold all the parts together that make the motorcycle do what it does; i.e., be ridden by a person and to keep the wheels in a correct relationship to each other at all times. Let’s call that Frame Fact #1.
What else is there? Well, not much once Frame Fact #1 has been established there really are only two other considerations to be taken into account. The first is “how it looks,” and the second is “how it handles.” Both of these attributes are subjective and both are a matter of personal taste. In the world of custom bikes, very often extremely radical personal taste is taken into account as well.
Therefore we need to decide what type of frame we want to build. This is dictated by the type of bike we are after: chopper/bobber/café racer/tracker…
What we are going to do for these articles is to go through the steps and procedures necessary to build a rigid chopper frame. There are a couple of reasons we’ll discuss rigids for this; it’s arguably the most simple of frames to write about building, and it’s a good frame to start with for a novice frame builder. For example, there is no need to take into account rear suspension set ups and geometry, and we also need to be talking in a pretty general way for this type of article and a rigid chopper frame fits the bill quite nicely, so let’s run with that. This is the beginning and the basics of frame building apply to all types of frames, so we’ll keep the complications to a minimum to start.
What do we need in our shops to attempt building a frame? We’ll make a couple of lists, (you knew I was going to say that) and we’ll start with the personal skills that will be useful/needed. Bare in mind that if you don’t have some or all of the skills I’m about to list that you either need a very fat wallet, or a buddy/buddies that you can coerce/bribe/blackmail into helping you out.
Skills (in no particular order of importance):
1. Basic metalwork skills
By this I mean the ability to use a hacksaw (and cut straight) and a file (and file flat). basic metalwork skills include the ability to use a drill press and a hand held drill and center punch accurately on the tube (I suggest you practice on that as it isn’t as easy as it looks). Lastly, you need the ability to use an angle grinder and the various discs available including wire brushes.
2. Welding skills
Go back to our Setting Up Your Home Garage articles. TIG welding skills are outstanding and current state of the art in the bike building world. But MIG is perfectly good enough for frame building. PLEASE! IF YOU HAVE ANY DOUBTS WHATSOEVER ABOUT YOUR WELDING ABILITIES, GET HELP FROM SOMEONE EVEN IF IT MEANS TAKING A COURSE. And, no I won’t apologize for shoutin at ya’ll. Some things are too important to whisper.
 |
| fishmouth tube notch |
You need to be at relatively proficient and at ease with the tools mentioned above. If you have metalwork experience but not much in tube work, a surprisingly common scenario, get hold of some cheapo scaffold or steel plumbing pipe and practice your techniques on it. Practice cutting it square and notching a fishmouth into it, practice drilling through squarely, both with the drill press and the hand held. Before you take a pen to paper or a finger to a keypad to order your steel tube to build your frame, practice, practice, practice on some cheap **** to get your confidence up, you’ll be glad you did. As in all things in your workshop, common sense must prevail.
That more or less covers what you need to know how to do yourself. Now for…
Equipment:
1. A frame jig
Previously mentioned in our Setting Up Your Home Garage articles. There are drawings and plans available for these all over the internet, some are gold some aren’t. It would take years to try and assess them all, so I have to leave that to you. Hopefully by now you’ll have sorted something out that suits your needs, and it’s sitting there in the shop awaiting some funny shaped tubing.
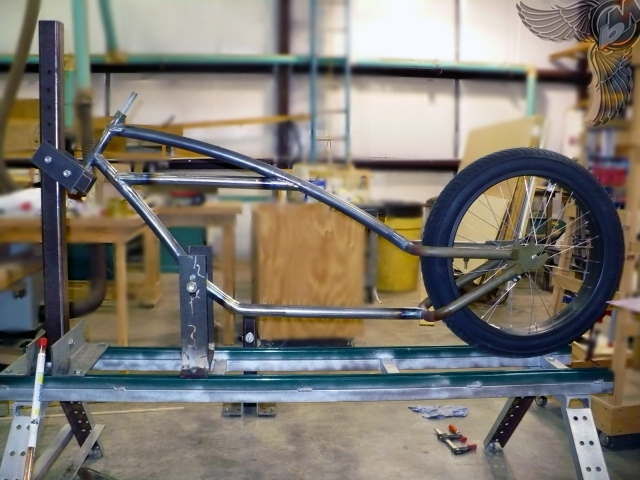 |
| home made frame jig |
2. Tube bender
This is the same deal as with the jig. Although technically you don’t actually need to own one (unlike the frame jig), as long as you have handy and available access to one, you’ll be fine. By handy I really mean in the same street, if not next door. Yeah. I know it’s unlikely, I’m just trying to cover all the bases and save you a few bucks. Friends with tools good.
3. Hand and power tools mentioned above
Get a good assortment of discs as well as drill bits.
4. Tube notcher
This is not essential because there are other ways of doing it, but if the budget will run to it, get a tube notcher. Joint Jigger is a good example, although there are a few good ones out there. I have to admit that when these first appeared I was skeptical to say the least, I dislike “gadgets” intensely and saw these as the same. Then a buddy of mine got one and I borrowed it to evaluate and was sold. They are a godsend and that humble pie tasted really good! Seriously, they are very useful and most importantly they are accurate (as long as you can read a tape measure). Oh and before I forget, check out this little beauty, a tube coping calculator. It’s a very useful little program for calculating and producing a template for any given angle of notch and tube size. I won’t bother explaining more, just download and have a play. You will need a printer to run off your templates, so click here for that.
5. Last but not least, SAFETY EQUIPMENT!
C’mon now people, you’re all grown-ups and I already mentioned common sense. Have an operable fire extinguisher or two handy, safety glasses, gloves, etc. This is all good, clean, dirty fun, but it sort of takes the shine off when you’re sitting in the emergency room having an eye taken out or a finger or two sewn back on.
Be careful and have fun while remembering this is a positive and creative pastime and we all want to enjoy the fruits of our labors, not to mention the labors themselves.
That more or less covers what we need as far as our skills and tools are concerned, but what about materials I hear you ask?
Looking at the basic chopper type frame we are going to be theoretically building it’s actually a pretty simple affair in reality. Regardless, there are a few obvious differences between the average rigid frame built to take an Ultima El Bruto and running gear and a Yamaha XS650 motor. The design fundamentally remains the same for both models, they will be different in length for sure, but that’s a pretty obvious difference. What isn’t so obvious is the frame tube size. In general the “industry standard” tube size used by most builders for big twin builds is 1.25” Dom or Seamless Tubing, in 10 and 12 gauge wall thickness.
Make no mistake, this is pretty serious structural tube. Especially when we look at what the factories are using on their frames. Harley uses 1″ and 7/8″ diameter on their big twin frames and most Japanese factories are using 7/8″ on their frames. The really big difference that none of us can see is that no manufacturer uses seamless tubing exclusively and the wall thicknesses of some of the factory frames tubes is downright scary to see. I’m not saying that the factory stuff is badly built. To be fair, we don’t hear of frame problems today with steel tubular frames, so they obviously work.
So why has the custom world ramped up on tube dimensions? There are a couple of reasons for this. Back in the day (1970’s) when Mr. Ness and chaps like him where building what have become known as Diggers (choppers were soooooo 1960’s, dude. Get with it, man!), they were basically lengthening the standard frames to emulate their drag racing counterparts for the street. Now this worked to a degree, although handling was, shall we say…. interesting, with something like 18 inches more of thin wall tubing trying to be twisted off the engine cradle every time the front wheel changed direction, but as with all things custom, it was tolerated and deemed the price to pay for looking cool.
As is our way on bikerMetric and everywhere in the custom motorcycle industry, we are constantly looking for a new angle on this and a new angle on that in the name of individuality, and as the frames seemed to have been pushed to the limit, next area of attention was the engine and drivetrain, and before we knew it there were seriously tuned diggers; turbo charged, super charged, and even multi-engined versions appeared.
In fairness many of the bigger builders only built these things as show boats and they were trailered to shows. A lot of them didn’t even have internals in the engines but a lot of average Joes looked at these creations and copied them. Sadly they were deathtraps and a lot of nastiness on the roads ensued! Thankfully things calmed down and the digger style died with disco. In that time lessons had been learned and the builders figured that using thin wall, skinny tube for any great length wasn’t the way to go. None of us had multi-million dollar Research & Development plants that we could try our our ideas on and perfect a tube size for a given frame application, so we played it safe and upped the diameter and wall thickness. After all, it seems most engineers will tell you that the fastest way of fixing most problems is to throw more steel at it (take a closer look at any Mercedes or Porsches)!
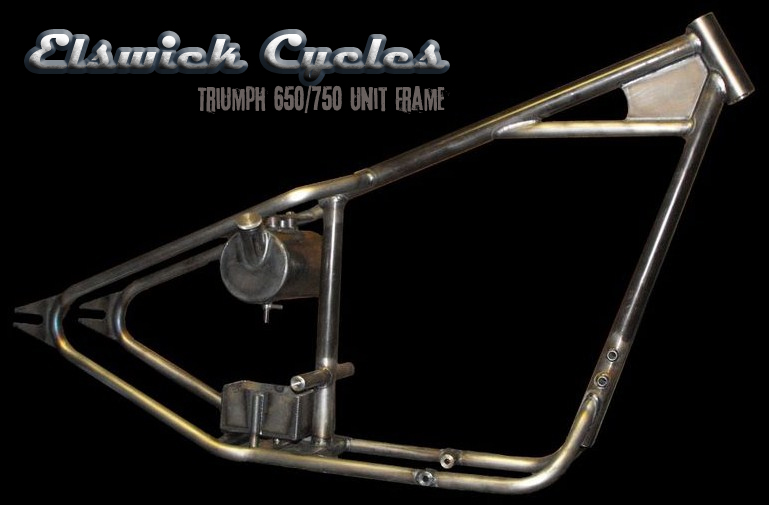
So what are we gonna do? I figure that we’ll take the middle road and use 1″ 12 gauge CFS 3 or DOM seamless and go through the steps of building a Triumph/XS style chopper frame. 10 gauge equates to more or less 3.2mm or 1/8″ , and 12 gauge is slightly less than that. You can ballpark these thicknesses as pretty much 1/8″ or 3mm.
Where to start then? The first thing you should do is actually be aware of what you want. Seriously! You’d be amazed at the percentage of people who say they want to build a bike and then actually have no idea what they actually want to build. The easy way around this is to do a sketch of what you have in mind. We’ve all seen “Biker Build Off” and the cocktail napkin sketches.
Don’t knock it because some of the tastiest builds on the planet started as the drunken scrawling of someone on a cocktail napkin. It doesn’t matter if you go online and find detailed blueprints of what you want to build, have the drawing/draftsman skills yourself to draw up plans for what you want to build or do a sketch with one of your kids crayons. The point is that you need a visual representation before you start, not only to help keep you on track through the building process, but unless you can just reach up to a rack and pull off lengths of available tubing, some sort of sketch/drawing will be necessary to come up with a materials list that’s in the ballpark. So, on that note, and from experience you will need:
1. Two lengths of tube of the appropriate diameter and wall thickness
In our case 1″ 12 gauge CFS 3 or DOM seamless. A length is 4 metres or 13 feet. The average chopper frame takes between 6 and 7 metres of tube. It never pays to ask the supplier to cut some off a length for you. Buy the whole length, it is always the cheapest option. After all, you can use it up on other stuff anyway and it won’t be wasted.
2. A couple of square feet of 1/8″ and ¼” flat plate for cutting out brackets and such.
3. A steering neck
This could be a whole article on it’s own. But in an effort to keep it short, I strongly recommend either getting hold of or making a steering neck to Harley specifications: i.e. 7″ long and sized to take 2””o/d and 1″ i/d Timken Roller Bearings.
NOT NECK CONES (shudders)! Why? Try this; go into any Yamazukonda dealer and ask for some replacement neck bearings for any model that takes your fancy. When you’ve picked yourself up off the floor and retrieved your now empty wallet and the re-mortgage contract on your house, pop round to your local bearing supply house and ask for a set of 2″ o/d and 1″ i/d Timken Roller Bearings. Yeah, I know!That cost less than a pack of cigarettes! How freaky is that? I think I made my point. Life ain’t fair I know, and it sure as f**k ain’t when it comes to *** bike replacement parts. Yes, you might have to get one turned up. There are plenty all over the internet and they’re not expensive, or you might have to turn one up yourself, which is not at all difficult for a competent lathe guy. But in the long run it will make life easier and cheaper to run your sickle by taking my advice here.
4. Rear spindle carriers
Again, this is a subject that could take a lot of space that we haven’t really got. The cheapest way out is some of the flat plate that’s on your shopping list above. The easiest way is to order a pair off one of the many parts suppliers online. There are many out there, plate billet, concealed nuts, square ones, oval ones, the world is your oyster. It’s up to you how you play this. In case when we get further down the road I’ll explain how to make some flat plate types with the only the tools that we’ve equipped our shops with. You’ll like that one.
So to quickly re-cap: We have our attitude set to hardcore and ready to kick some steel ***! We have our tools sitting there waiting for us to get all medieval on the steel. We have the steel tube and various other parts and pieces quivering over in the corner knowing that they are going to get seriously slapped about and mutilated very shortly.
Stay tuned for the next installment, where we get into reshaping the steel into the image on our cocktail napkins!

Get the best of bikerMetric directly in your inbox, once a week, every week.
 bikerMetric custom metric bobbers, choppers, and cafe racers by honda, yamaha, kawaski, and suzuki







Well I was just curious where you took my frame jig picture from? Yes that’s right, that frame jig I built from random materials laying around my shop to build a cruiser bicycle frame. I’ve since used it for several motorcycle frames. It worked very well and didn’t cost a ton of cash.
Travis Lawson
Owner
Iron Spade Cycles
Great site for us budding bike builders, keep up the good work
got to say this was by far one of the most down to earth,fun to read,enjoyable sites I’ve ever visited.I ride,build and paint all my Bikes & have for the last 50+ yrs.I’m a retired Body & Paint man, Airbrush Artist,etc. Really like the “Down To Earth” approach to this site,definitely will follow & read more,my “Bro” & I build/Rework our own frames,All sheet metal and Drive Trains-“Keep the Shiney Side Up Bro!!”/partner/WA.state
What are rear spindle carriers?